Bank statements
Bank Bridge imports statement data, recognizes customers and vendors, and supports automatic application of their ledger entries. Operation code mappings assign accounts to transactions such as bank fees and interest.
Use this workflow to review an imported statement and prepare it for posting.
Import the statement
First configure the bank account in Bank Bridge Statements Setup, including its import format, code page and destination journal.
- Open Bank Bridge Statements.
- Choose Home > Import Statement and complete the import for the bank account using its configured format. For file exchange, use the statement file obtained from the bank.
- Find the imported statement in the list. Bank Account No. Filter can help narrow the list to the relevant account.
- Review the bank account, statement number and date, then open the statement card.
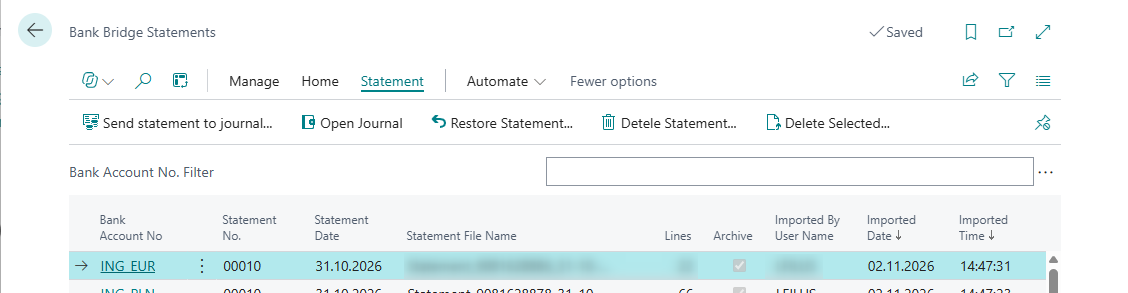
The screenshot shows the Statement action group. Import Statement is under Home.
The list also shows Lines, Archive, Imported By User Name, Imported Date and Imported Time, which help identify the statement and its import history.
For direct statement retrieval through an API, use the process supported by the configured bank connection.
Bank Bridge prevents importing a file with the same filename again while its statement record exists. If you need to replace an imported file, follow Reimport a replacement statement file.
Open the statement card
Check that the Bank Bridge Statement belongs to the intended bank account and statement date.
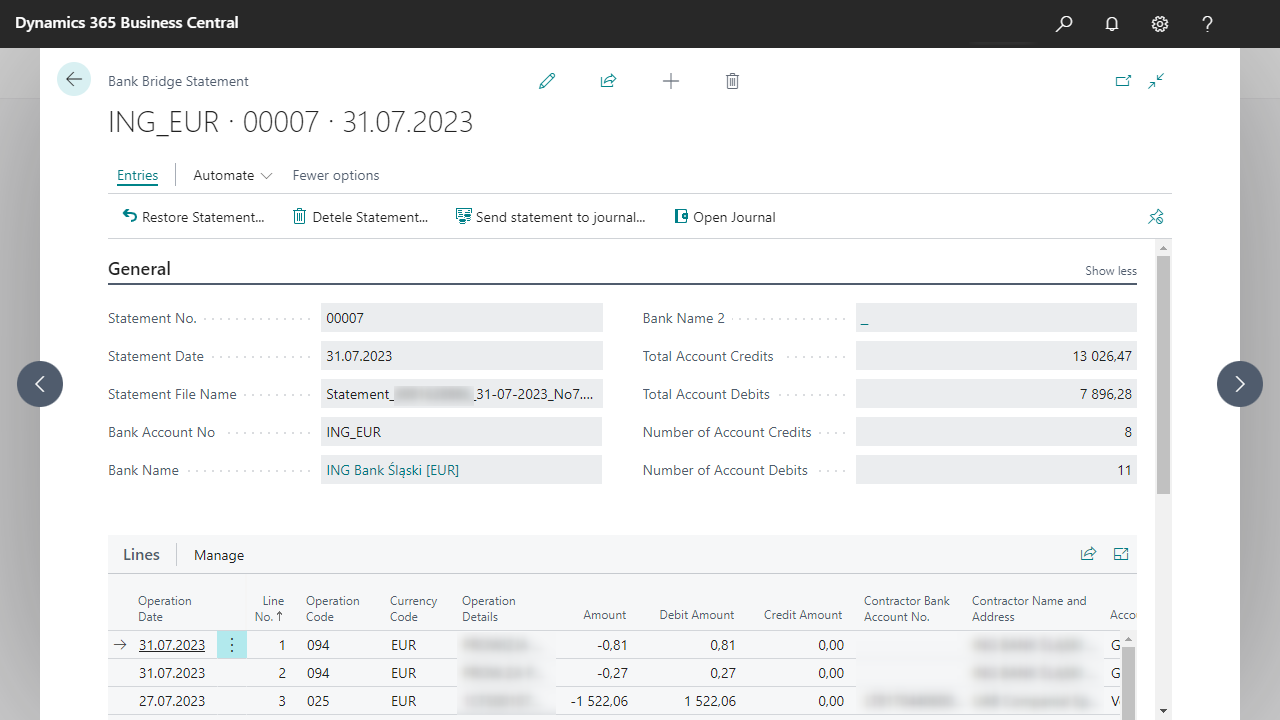
The example is a statement for ING_EUR. Select the image to inspect its header and lines.
Check the statement header
Compare the imported header with the original bank statement:
| Field | What to review |
|---|---|
| Statement No. | The identifier of the imported statement. |
| Statement Date | The statement date. |
| Statement File Name | The source filename, where applicable. |
| Bank Account No. | The Business Central bank account receiving the statement. |
| Bank Name | The bank account description. |
| Total Account Credits / Total Account Debits | The imported totals for each side of the account activity. |
| Number of Account Credits / Number of Account Debits | The corresponding transaction counts. |
Investigate a difference in totals or transaction counts before moving the statement into the posting process.
How account recognition and entry matching work
Bank Bridge identifies the customer or vendor by the counterparty's bank account number from the statement transaction.
After recognizing the customer or vendor, it looks for the ledger entry to apply in this order:
- Description: try to match the entry using the transaction description.
- Exact amount: if description matching finds no entry, look for an open entry for that customer or vendor with the exact amount.
- Use the amount fallback only when exactly one open entry has that amount. If several open entries have the same amount, the amount alone does not identify the entry to apply.
For example, if description matching fails and the customer has one open entry for the exact payment amount, Bank Bridge can use that entry. If two open entries have that amount, review the intended application manually.
Review the lines and recognized accounts
Check the transaction's Operation Date, Operation Code, Currency Code, Operation Details and Amount against the bank information.
Review the assigned Account Type and Account No.:
- For customer and vendor transactions, check the recognized account and the ledger entry application associated with the payment.
- For bank charges and similar operations, check the result of operation code mapping.
- Investigate any line that remains unassigned or points to an unexpected account.
Automatic recognition and application reduce manual work, but their results should still be reviewed before posting.
Send the statement to the journal
- After reviewing the statement, choose Entries > Send statement to journal... on the card. The same action is available under Statement on the statements list.
- Choose Open Journal from the card or list.
- Review the journal lines, document numbers and customer or vendor applications.
- Complete the balance checks and posting review.
The destination journal template and batch come from Bank Bridge Statements Setup. If Do not Increment Document No. is enabled there, the whole statement uses one document number; otherwise, its lines receive separate document numbers.
Sending a statement to the journal prepares the accounting lines for review. Complete the posting process in the journal after the checks are finished.
Restore and reprocess a statement
Use Restore Statement... when you need to edit an archived Bank Bridge statement and send it to the Cash Receipt Journal again. A common reason is to correct the balancing account assigned to a transaction, such as the Customer, Vendor, Employee or G/L Account.
The action only clears the statement's archived status, shown as Archive in the statements list. This makes the statement available for editing and processing again.
Journal cleanup and posting reversals are separate steps
Restore Statement... does not delete existing Cash Receipt Journal lines and does not reverse any posted entries. Before sending the statement again, manually remove its original unposted journal lines or reverse its original postings using standard Business Central procedures, as appropriate. Otherwise, sending and posting the statement again can duplicate the accounting entries.
Choose the procedure that matches the statement's current state:
| Situation | Procedure |
|---|---|
| The statement is in the journal but has not been posted. | Correct a statement before posting. |
| The journal has already been posted. | Correct a statement after posting. |
| The source file needs to be replaced and imported under the same filename. | Reimport a replacement statement file. |
Correct a statement before posting
This is the usual correction workflow: the accountant notices an incorrect account assignment while reviewing the Cash Receipt Journal.
- Open the destination Cash Receipt Journal, identify the unposted lines belonging to the statement and delete those lines manually. Leave lines belonging to other statements in place.
- Return to Bank Bridge Statements, select the statement and choose Statement > Restore Statement.... The same action is available under Entries on the statement card.
- Open the restored statement and correct Account Type and Account No. on the affected lines. Assign the appropriate customer, vendor, employee or G/L account, then review the remaining lines.
- Choose Send statement to journal... and then Open Journal to review the new journal lines.
- Check the accounts, amounts, document numbers, ledger entry applications and statement balances, then post the journal.
For example, if a receipt was assigned to the wrong customer, remove the original unposted journal lines, restore the statement and assign the correct customer on the statement line. Sending it to the journal again creates the lines for the corrected review and posting.
Correct a statement after posting
If the Cash Receipt Journal has already been posted, its accounting entries must be reversed before the statement is processed and posted again.
- Manually reverse the original statement postings using the standard Business Central procedures appropriate to those entries. Verify that the reversal is complete.
- In Bank Bridge Statements, select the statement and choose Statement > Restore Statement....
- Open the statement and correct the affected lines' Account Type and Account No. Review the statement before sending it again.
- Choose Send statement to journal..., open the journal and complete the account, application and balance checks before posting the corrected lines.
The reversal is performed separately in Business Central. Restoring the Bank Bridge statement leaves the existing posted entries unchanged.
Reimport a replacement statement file
Occasionally, the imported file itself needs to be replaced. For example, a statement may have been exported or imported with an incorrect character encoding, and you need to obtain a corrected file from the bank and import it again under the same filename.
Bank Bridge blocks a second import of the same filename while the existing statement record remains. Restore Statement... alone does not remove this block. Restoring and then deleting the Bank Bridge statement allows the replacement file to be imported.
- Check whether the original statement has already been sent to the journal or posted. Manually delete its unposted journal lines, or reverse its posted entries using standard Business Central procedures, before processing the replacement.
- In Bank Bridge Statements, select the original statement and choose Restore Statement... if it is archived.
- Choose Delete Statement... to delete that Bank Bridge statement record.
- Obtain the corrected export from the bank where needed. Verify Import Format and Code Page in Bank Bridge Statements Setup against the replacement file.
- Choose Home > Import Statement and import the replacement file. The same filename can now be used.
- Review the imported statement from the beginning, including descriptions, totals and account assignments. Send it to the journal, complete the balance and application checks, and post when the review is finished.
Use this workflow when the source data needs to be imported again. For an account assignment correction, restore and edit the existing statement using the procedures above.